Resisting sticking or damaging your enameled Dutch oven can be tricky, especially if you’re unsure how to care for it properly.
The good news is that with some simple habits, you can keep your cookware in top shape and improve your cooking results.
Following a few best practices—like gradual preheating, using the right oils, and gentle cleaning—makes all the difference.
Keep reading to learn how to protect and maximize your Dutch oven’s performance over time.
How to Preheat Your Enameled Dutch Oven Safely
To preheat your enameled Dutch oven safely, start by adding a small amount of oil or butter to the bottom of the pot before turning on the heat. Never preheat an empty enameled Dutch oven, as this can cause thermal shock and crack the enamel. Begin on low heat and increase gradually over 5 to 10 minutes to allow even warming. If you plan to use the oven, place the cold Dutch oven inside before turning it on to avoid sudden temperature changes. Keep the oven temperature below 500°F, and ensure plastic knobs do not exceed 375°F to prevent damage. Avoid rapid temperature shifts, such as submerging a hot pot in cold water, and always watch the heat levels to extend the life of your cookware. Using these gentle preheating techniques helps protect the enamel and ensures your Dutch oven lasts for many cooking sessions. This approach mirrors the precise temperature control used in sous vide cooking for achieving consistent results. Additionally, ensure the pot is completely dry before preheating to prevent flash rust on any exposed iron edges. For similar precision in candy making, you would need a specialized thermometer designed to withstand temperatures over 300°F.
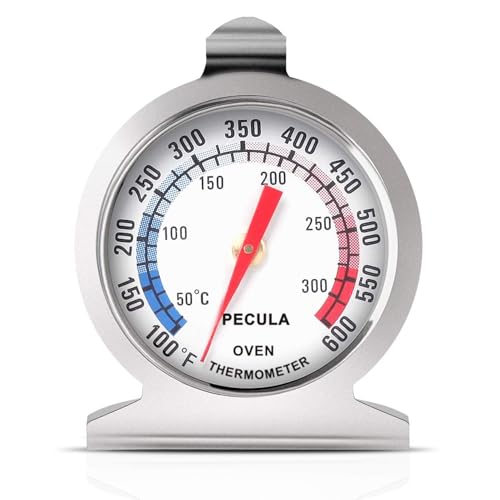
Clear Dial Display: PECULA's analog oven thermometer delivers precise, instant readings from 50–300°C / 100–600°F. Its dial features clear dual-zone blue and red indicators for at-a-glance temperature monitoring—perfect for ovens, grills, smokers, and deep fryers, ensuring you master every bake, roast, or fry.

Crock Pot Artisan Oval Enameled Cast Iron Dutch Oven, 7-Quart, Scarlet Red w/Lid

OVEN SAFE DESIGN: Withstand temperatures up to 500 degrees Fahrenheit, making this enamel cast iron dutch oven suitable for various cooking methods
Best Oils for High-Heat Cooking in Your Dutch Oven
The best oils for high-heat cooking in your Dutch oven are those with high smoke points and neutral flavors. Refined avocado oil stands out, with a smoke point ranging from 480 to 520°F, making it perfect for searing at very high temperatures. Grapeseed oil is also suitable, handling up to 420°F without burning. Peanut oil reaches around 450°F, while high oleic safflower oil is another strong choice due to its stability under heat. Just as in cast iron cooking, using oil at high heat helps polymerize the oil to create a protective seasoning layer, though enameled surfaces do not require seasoning for nonstick properties. For precise candy syrups, however, a digital probe thermometer is far more reliable than an infrared thermometer.
For general cooking, stick to neutral, high-smoke-point oils to prevent interference with your dish’s flavor. Light refined olive oil works well for roasting, but reserve extra-virgin olive oil for finishing dishes where its flavor can shine. Avoid aerosol sprays; instead, apply a thin coating directly from the bottle to protect your enamel surface and ensure even cooking. For reference, a butane torch can reach temperatures high enough to melt silver, demonstrating that typical cooking heat is far below such extreme levels.

Graza Frizzle Oil Made from 100% Olives: A neutral-flavored, high heat cooking oil made from 100% peak harvest olives. With a smoke point of up to 450 degrees, Frizzle is your high-heat kitchen hero. 1 bottle/750ml.

Light Buttery Flavor That Elevates Every Meal: Algae Cooking Club Chef-Grade Algae Oil enhances every dish with subtle richness. Its neutral profile makes it ideal for searing, baking, and dressings, transforming everyday meals into gourmet experiences.

Light Buttery Flavor That Elevates Every Meal: Algae Cooking Club Chef-Grade Algae Oil enhances every dish with subtle richness. Its neutral profile makes it ideal for searing, baking, and dressings, transforming everyday meals into gourmet experiences.
How to Sear Meat Without Sticking in a Dutch Oven
Preheating your enameled Dutch oven gently with a thin layer of oil is key to preventing sticking. This creates a smooth surface and helps distribute heat evenly without damaging the enamel. Before searing, pat your meat dry to remove excess moisture, which can cause sticking and steam instead of browning. Let the meat reach room temperature for more consistent searing. These thermometers are classified under HS Code 9025 for customs purposes, ensuring compliance during import and export of related kitchen tools. For long-term food preservation without a dedicated machine, the water displacement method offers an inexpensive alternative using only a zipper-lock bag and a pot of water.
Marinating can help reduce sticking by adding moisture, but always blot away excess marinade before placing the meat in the pan. Lightly dusting the meat with flour creates a natural barrier, making it easier to achieve a nice crust without sticking. Instead of oiling the pan directly, oil the meat itself for a better release.
Use medium heat—not high—as excessive heat can damage the enamel and cause sticking. Avoid overcrowding the pot; cook in batches if necessary to allow proper browning. Resist the temptation to move the meat too early; wait until a crust forms and it naturally releases from the surface. If bits stick to the bottom, deglazing with wine or stock will lift them and add flavor. The Dutch oven’s superior heat retention ensures even browning and prevents hot spots, enhancing the searing process.

Even Heat Distribution Retention: This Dutch oven Made with heavy-duty enameled cast iron, ensures even heat distribution for perfect searing and slow cooking, locking in flavors. thickened walls lock in heat for slow braising, searing, and baking. Unlike thin pots that scorch food, this professional-grade Enameled cast iron pot maintains steady temperatures

[Complete 7-Piece Set for Versatile Cooking] - This enameled cast iron cookware set includes a 4.8-quart large Dutch oven with lid, 2.8-quart small Dutch oven with lid, 2-quart sauce pan, and a 10.25-inch skillet. Perfect for a range of cooking techniques, from sautéing and grilling to slow cooking, roasting, and baking—an ideal gift choice for home chefs!

SUPERIOR HEAT RETENTION & EVEN COOKING – Heavy-duty cast iron construction delivers exceptional heat retention and even heat distribution for consistent cooking results, from slow-simmered stews to perfectly roasted meals.
Safe Utensils for Enameled Cast Iron
Silicone, wood, or nylon utensils are the safest options for your enameled Dutch oven. These materials are gentle and non-abrasive, helping to prevent scratches that can damage the enamel surface. Rubber and heatproof plastic tools also work well as gentle, heat-resistant alternatives. Avoid sharp-edged metal tools like knives, which can chip the glaze and lead to rusting. Although some manufacturers, like Le Creuset, say standard metal tools are safe, it’s best to use them with caution and gentle technique. Never bang utensils against the pot’s lip or use metal spatulas on hot cookware, as these can cause damage over time. Chips from metal contact expose the cast iron surface, which may lead to rust formation if not protected. After each use, thoroughly clean both your utensils and your Dutch oven to remove food particles that might cause chips or scratches later. Making these simple choices helps protect your cookware and ensures it lasts for many years.

Package Includes: You will receive 2 magnetic trivets and 2 pairs of Silicone Assist Hot Handle Holders. They are essential accessories, with enough quantity for daily use, replacements, and sharing. The classic color helps with decoration and makes them easy to find.

HIGH QUALITY NATURAL Acacia WOODEN HANDLE: Each utensil with durable hardwood, which is durable than ordinary wooden handle can last up to 40 years under the proper care. ATTENTION: because of the natural acacia wooden handle, Please do not soak in water for a long timeand or use the dishwasher, Do not use a sharp dishwashing brush to clean the wooden handle. It is recommended to hand clean the wooden handle with clean water or wipe it with a soft cloth. It needs to be dried before storage

Even Heat Distribution Retention: This Dutch oven Made with heavy-duty enameled cast iron, ensures even heat distribution for perfect searing and slow cooking, locking in flavors. thickened walls lock in heat for slow braising, searing, and baking. Unlike thin pots that scorch food, this professional-grade Enameled cast iron pot maintains steady temperatures
How to Remove Burnt Food From Your Dutch Oven
To remove burnt food from your enameled Dutch oven, start by filling the pot with water and adding two tablespoons of baking soda per quart. Bring the mixture to a boil and let it simmer for 10 to 15 minutes. Once it cools slightly, scrub the residue with a non-abrasive sponge. For tougher stains, mix equal parts water and white vinegar, bring the solution to a boil, and simmer for 5 to 10 minutes while gently scraping with a wooden spatula. Applying a paste made from equal parts baking soda and water to stubborn spots, then letting it sit for 15 to 20 minutes before scrubbing, can also be effective. For a more powerful alternative, fill the pot with hot water and add a dishwasher pod, allowing it to soak overnight to loosen crusty residues without damaging the surface. Repeat these steps as needed to restore your Dutch oven’s surface.

DUAL-SIDED DESIGN: Features two distinct cleaning surfaces - a textured scrubbing side for tough stains and a soft sponge side for gentle cleaning

5-Minute Fast Cleaning for Tough Stains:Easily cuts through baked-on grease, burnt residue, and heavy grime in just minutes. No soaking, no hours of scrubbing – just quick, effective cleaning that saves your time and effort

Made for Caraway Cookware Designed for Caraway cookware, these non scratch kitchen sponges help remove everyday residue without scratching or damaging delicate coated surfaces.
Prevent Thermal Shock in Your Dutch Oven
To prevent thermal shock in your Dutch oven, it’s important to control the initial heating process and avoid sudden temperature changes. Start on low heat, no higher than 3 out of 10, and gradually increase the temperature, waiting 3 to 5 minutes between each step. Always add oil, butter, or water before heating to distribute heat evenly and prevent dry-on-dry contact, which can cause cracking. Avoid exposing the pot to extreme temperatures — never use high heat or place it directly over a campfire. When cooling, let the Dutch oven cool naturally, instead of plunging it into cold water, as rapid cooling can cause the enamel to chip or crack. Use an infrared thermometer to monitor the temperature, keeping it between 375°F and 450°F during use, and always deglaze with liquids at room temperature to avoid temperature shifts. These practices help preserve the enamel and prolong the lifespan of your Dutch oven. Additionally, preheating slowly on low to medium heat ensures even heat distribution throughout the cookware.
Storage Tips That Protect Your Enameled Dutch Oven
Proper cleaning and thorough drying are essential to protect your enameled Dutch oven. After washing, dry both the interior and exterior with a soft cloth. To ensure all moisture is eliminated, briefly heat the pot on the stove to evaporate any hidden water, paying close attention to areas like the lid rim and pot lip where water can collect. This step helps prevent moisture buildup that could lead to rust or damage over time. For example, similar steam-trapping techniques are used when baking sourdough with common kitchen equipment like a preheated baking stone or a cast iron skillet to achieve a crisp crust. This careful approach is similar to ensuring sous vide cooking remains safe by avoiding moisture-related issues during extended cooking times. For enameled cast iron, the widely recommended cleaning method involves using warm soapy water with a stiff-bristled brush and coarse salt for stubborn spots, followed by thorough drying and oiling.